
1. Introduction
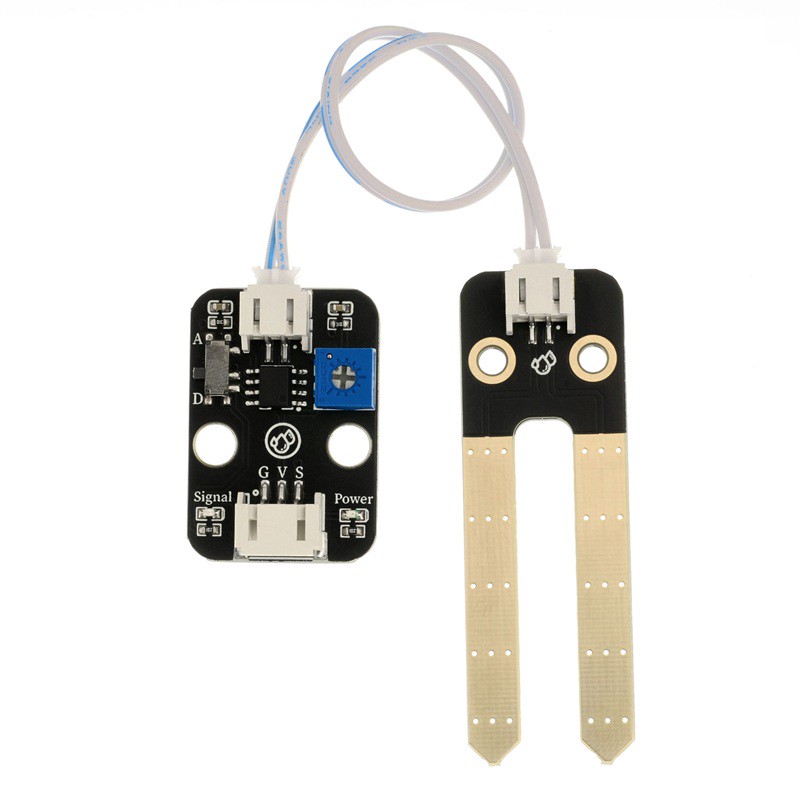
Soil moisture sensors are a type of sensing device, mainly used to detect the size of soil moisture and are widely used in automatic windshield wiper systems, smart lighting systems, and smart sunroof systems, etc.Sensor uses high-quality FR-04 double material, large area of 5.0 * 4.0 cm, nickel plated surface.It has antioxidant, conductivity, and superior durability; The sensitivity is adjusted with a potentiometer; The operating voltage is 3.3 V to 5 V.Output in the form of digital values (0 and 1) and analog AO voltage output, using a LM393 dual voltage comparator, when the sensor is connected to a 5V power supply, no humidity is detected on the sensing board, and the DO output is at a high level.When inserted into soil or water, the DO output is at a low level.If the sensor board is dry, the output will return a high-level state.AO analog output can be connected to the AD interface of the microcontroller to detect the humidity size above.Digital output can also be connected to a microcontroller to detect if there is a water shortage.
2. Schematic
Rainwater-soil humidity sensor module-HS-S09-L schematicClick to view
Module Parameters
Pin Name | description |
|---|---|
G | GND (Negative Power Input) |
V | VCC (Positive Power Input) |
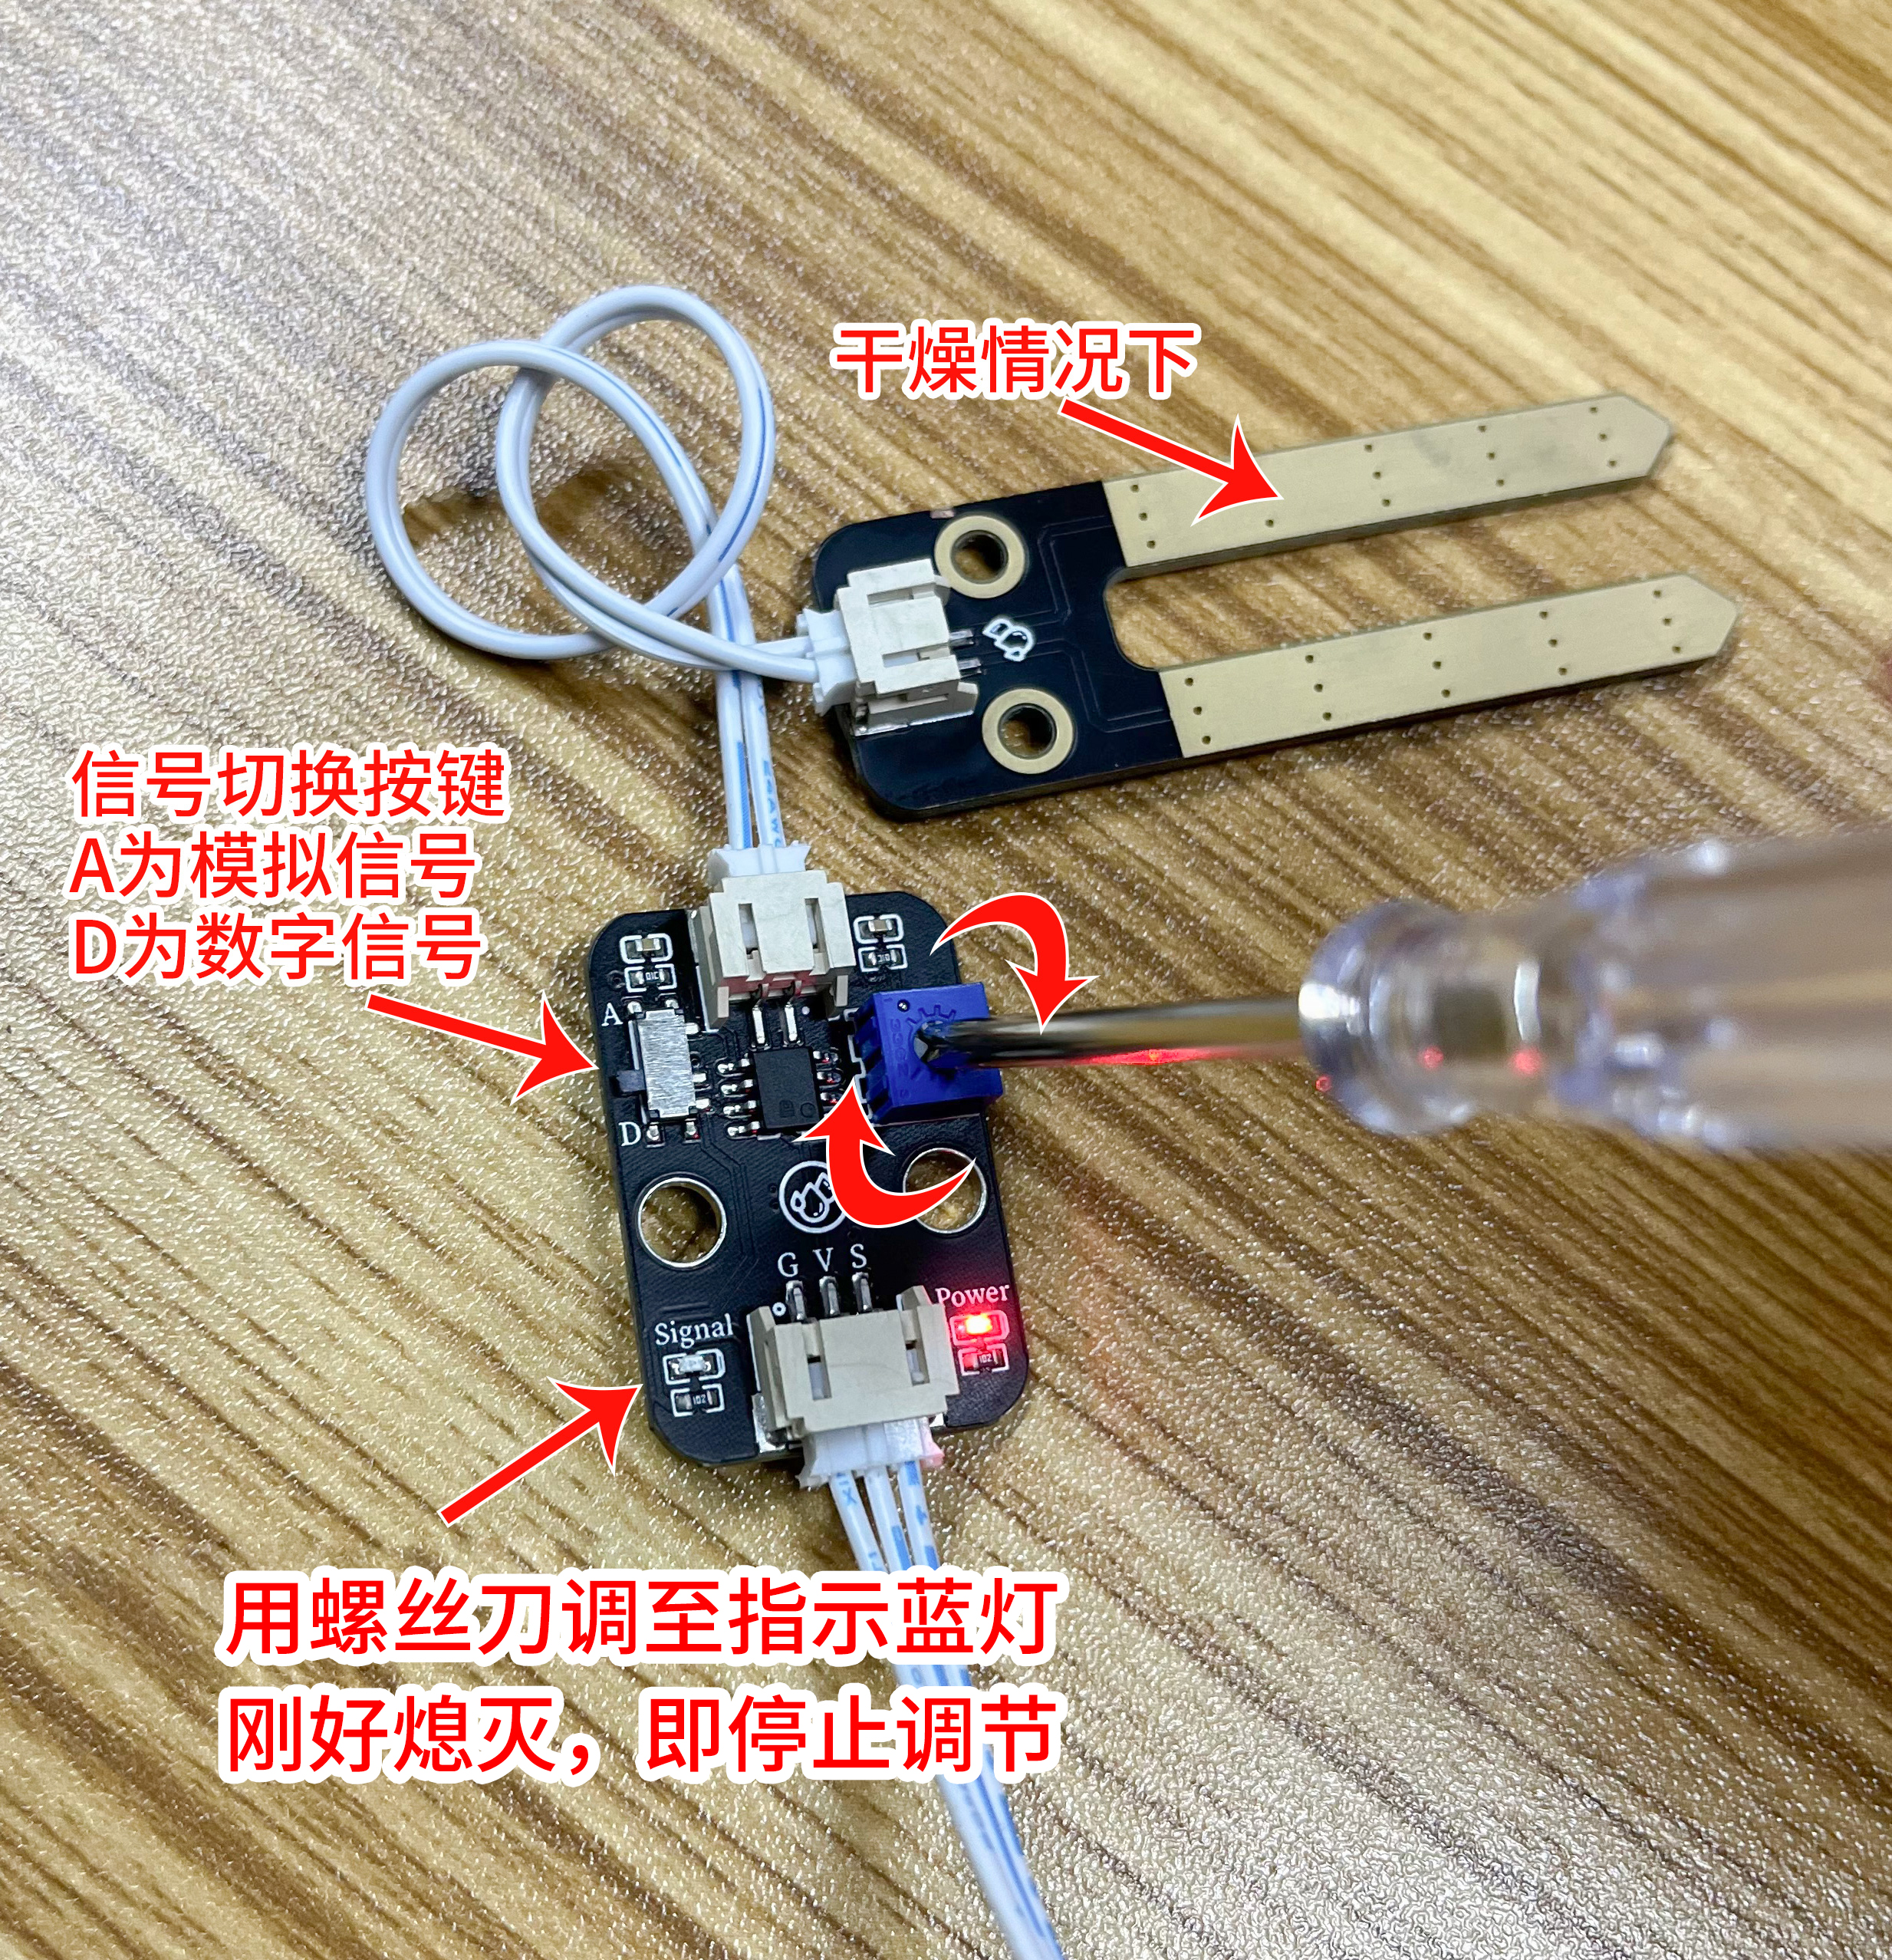
S | Digital Signal Pin |
A | Analog Signal Pin |
Power Supply Voltage: 3.3V / 5V
Connection Method: PH2.0 2/3P
Installation method: Screw fixed / Lego construction
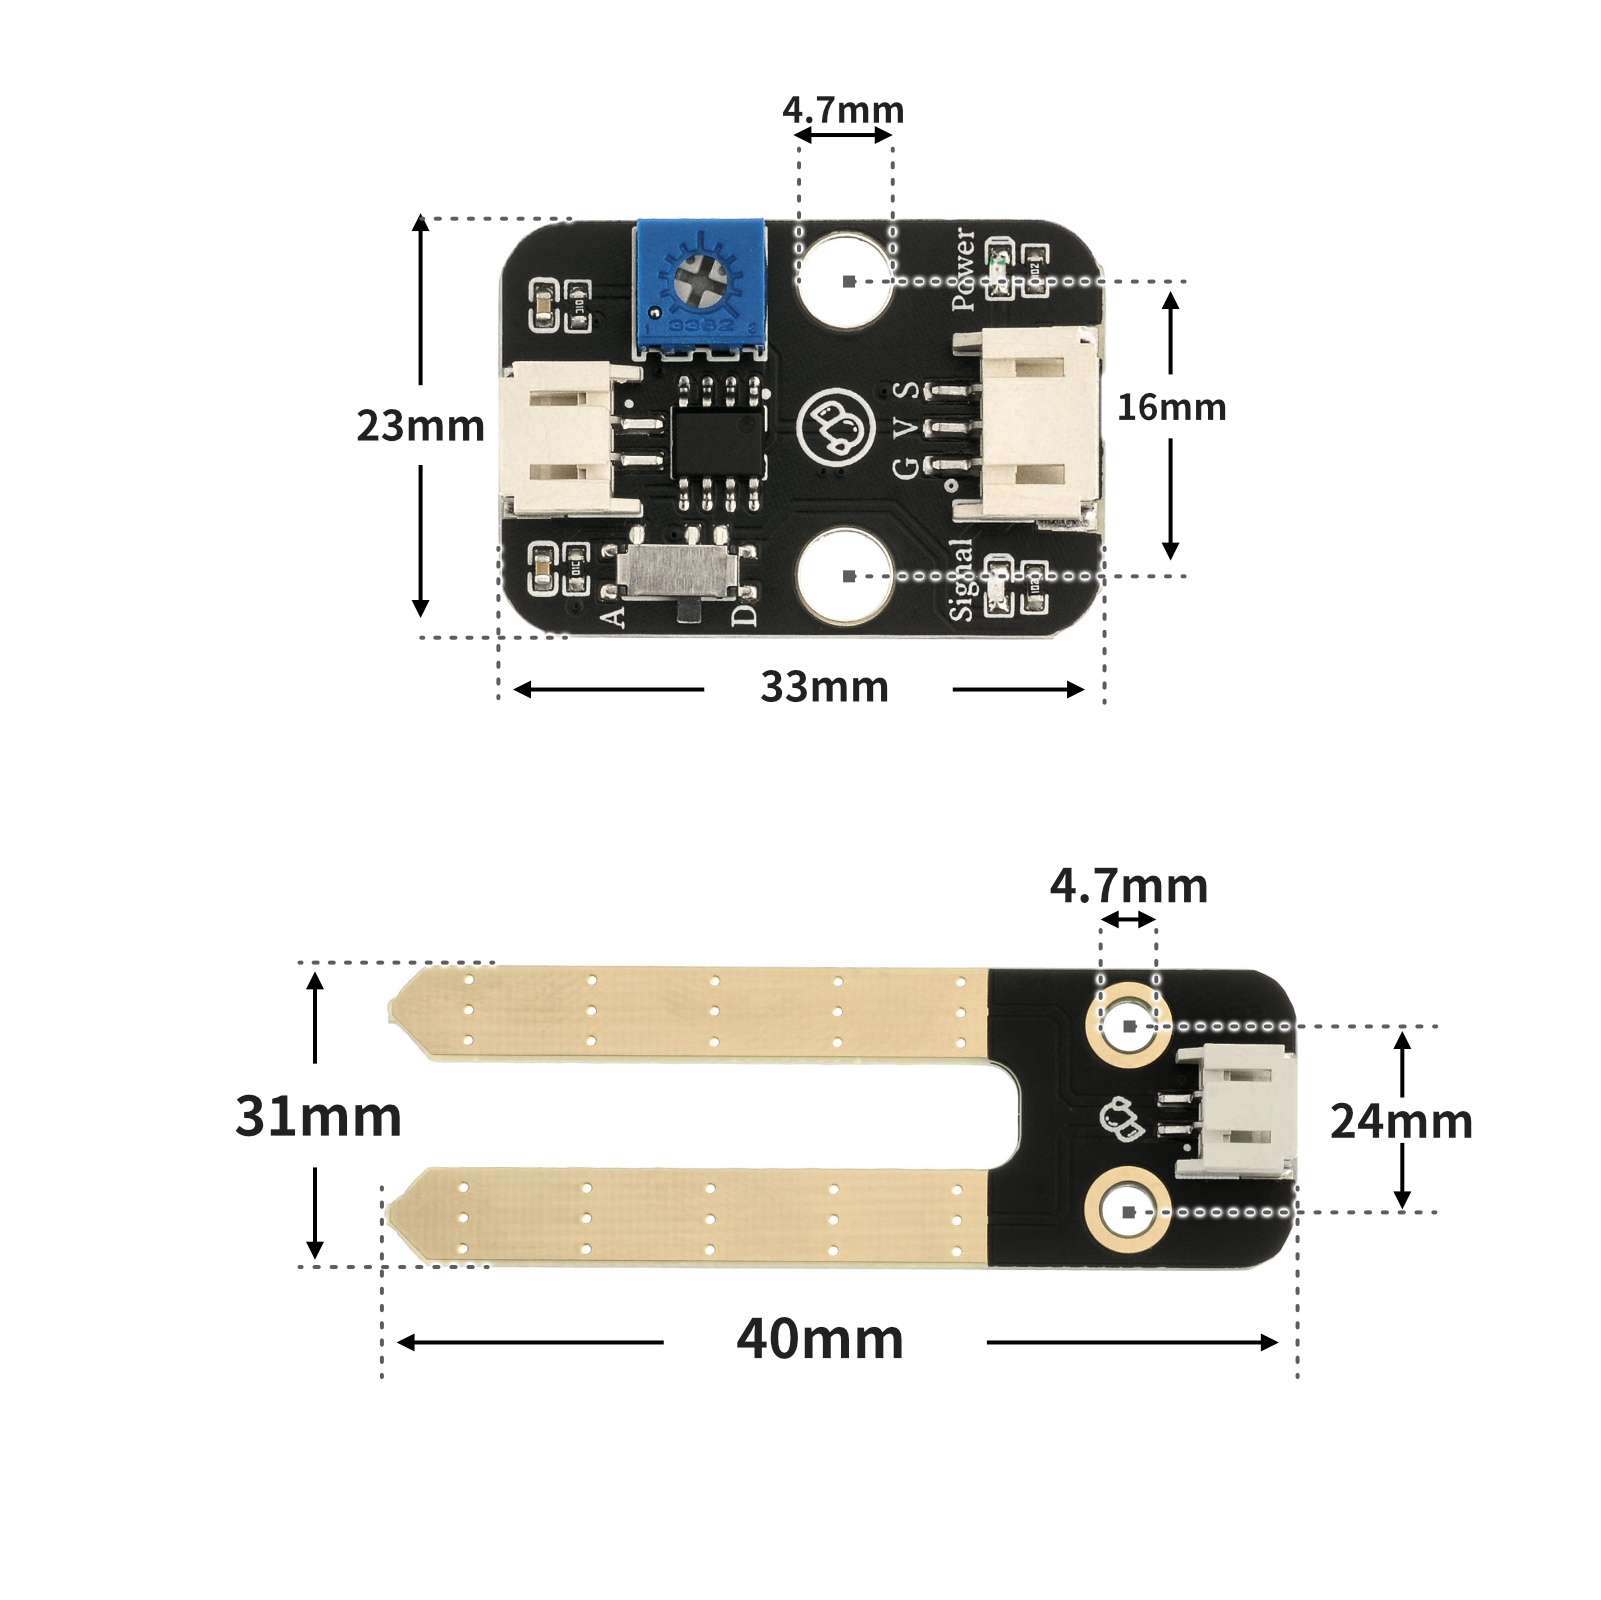
4, Circuit Board Size
5 of Arduino IDE example program
Attention: If prompted with an error message about the library file during program upload, please import the library file first!
Arduino IDE Library Download and Import Tutorial:Click to view
Example program (UNO development board):
void setup(){
  Serial.begin(9600);
  pinMode(3, INPUT);
  pinMode(6, OUTPUT);
  pinMode(3, INPUT);
}

void loop(){
  //雨滴检测模块接D3,有源蜂鸣器接开发板D6
  //

  //轻轻调节控制板模块背部电位器,土壤湿度感应板检测到湿度的情况下,控制板模块指示蓝灯亮起;
  //土壤湿度感应板干燥情况下,控制板模块指示蓝灯熄灭。
  if (digitalRead(3) == 1) {
    //土壤湿度感应板干燥情况下,输出高电平(1),控制板模块信号指示蓝灯熄灭,蜂鸣器不响。
    digitalWrite(6,LOW);
    Serial.println(String("干燥土壤:") + String(digitalRead(3)));

  } else if (digitalRead(3) == 0) {
    //土壤湿度感应板遇到水或湿润土壤的情况下,输出低电平(0),控制板模块信号指示蓝灯亮起
    digitalWrite(6,HIGH);
    Serial.println(String("湿润土壤:") + String(digitalRead(3)));
  }

}
6, ESP32 Python Example (for Mixly IDE/Misashi)
Choose the development board Python ESP32 [ESP32 Generic(4MB)] and upload in code mode
Attention: If prompted with an error message about the library file during program upload, please import the library file first!
Download and import tutorial for Mixly IDE ESP32 library:Click to view
Example program (ESP32-Python):
import machine
pin2 = machine.Pin(2, machine.Pin.IN)
pin4 = machine.Pin(4, machine.Pin.OUT)
while True:
if pin2.value() == 1:
pin4.value(0)
else:
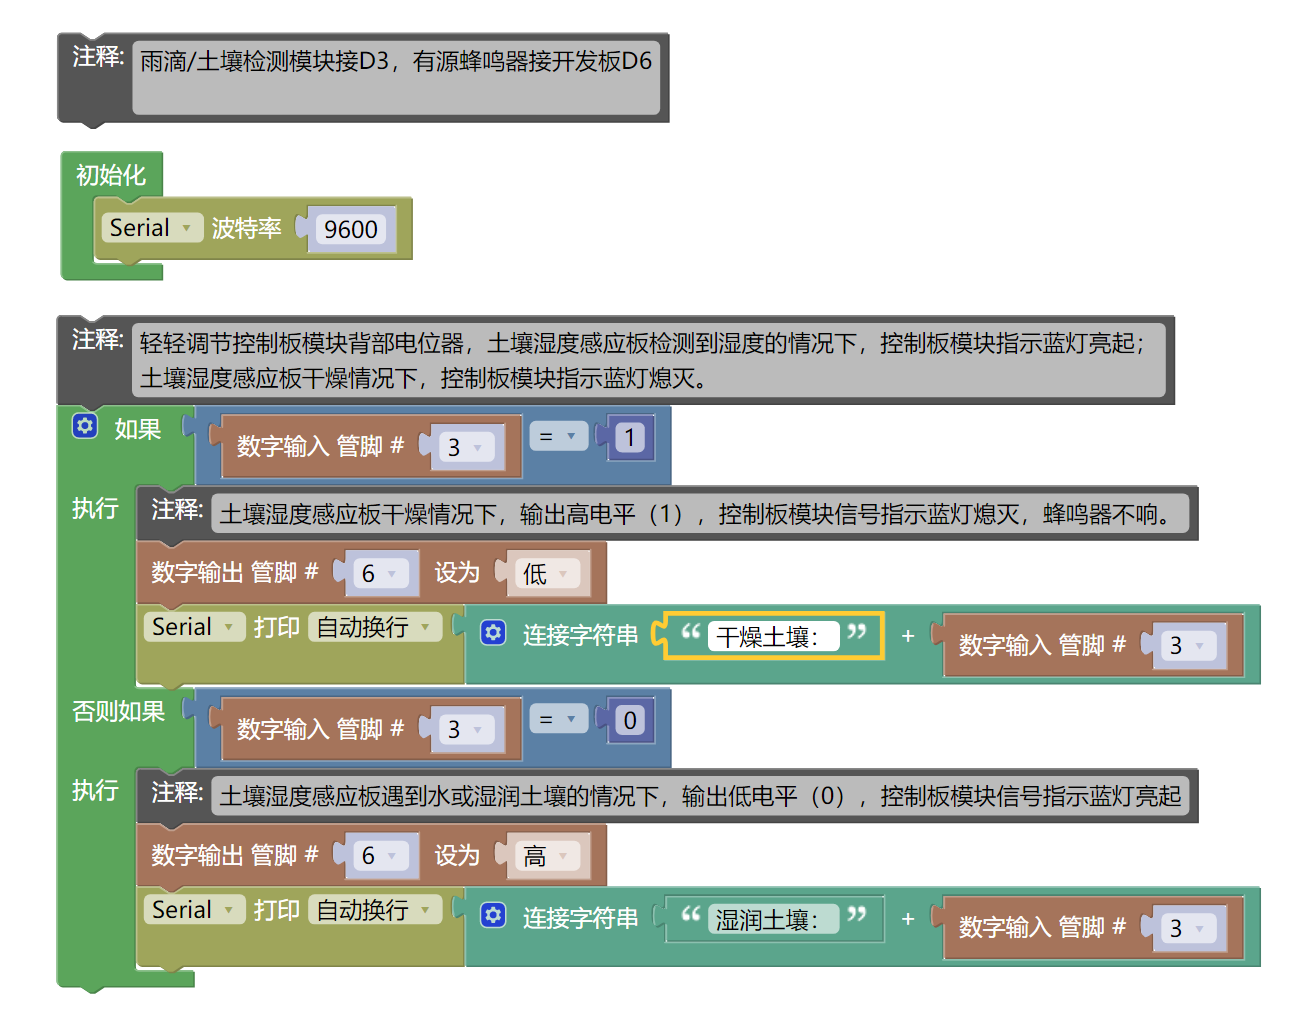
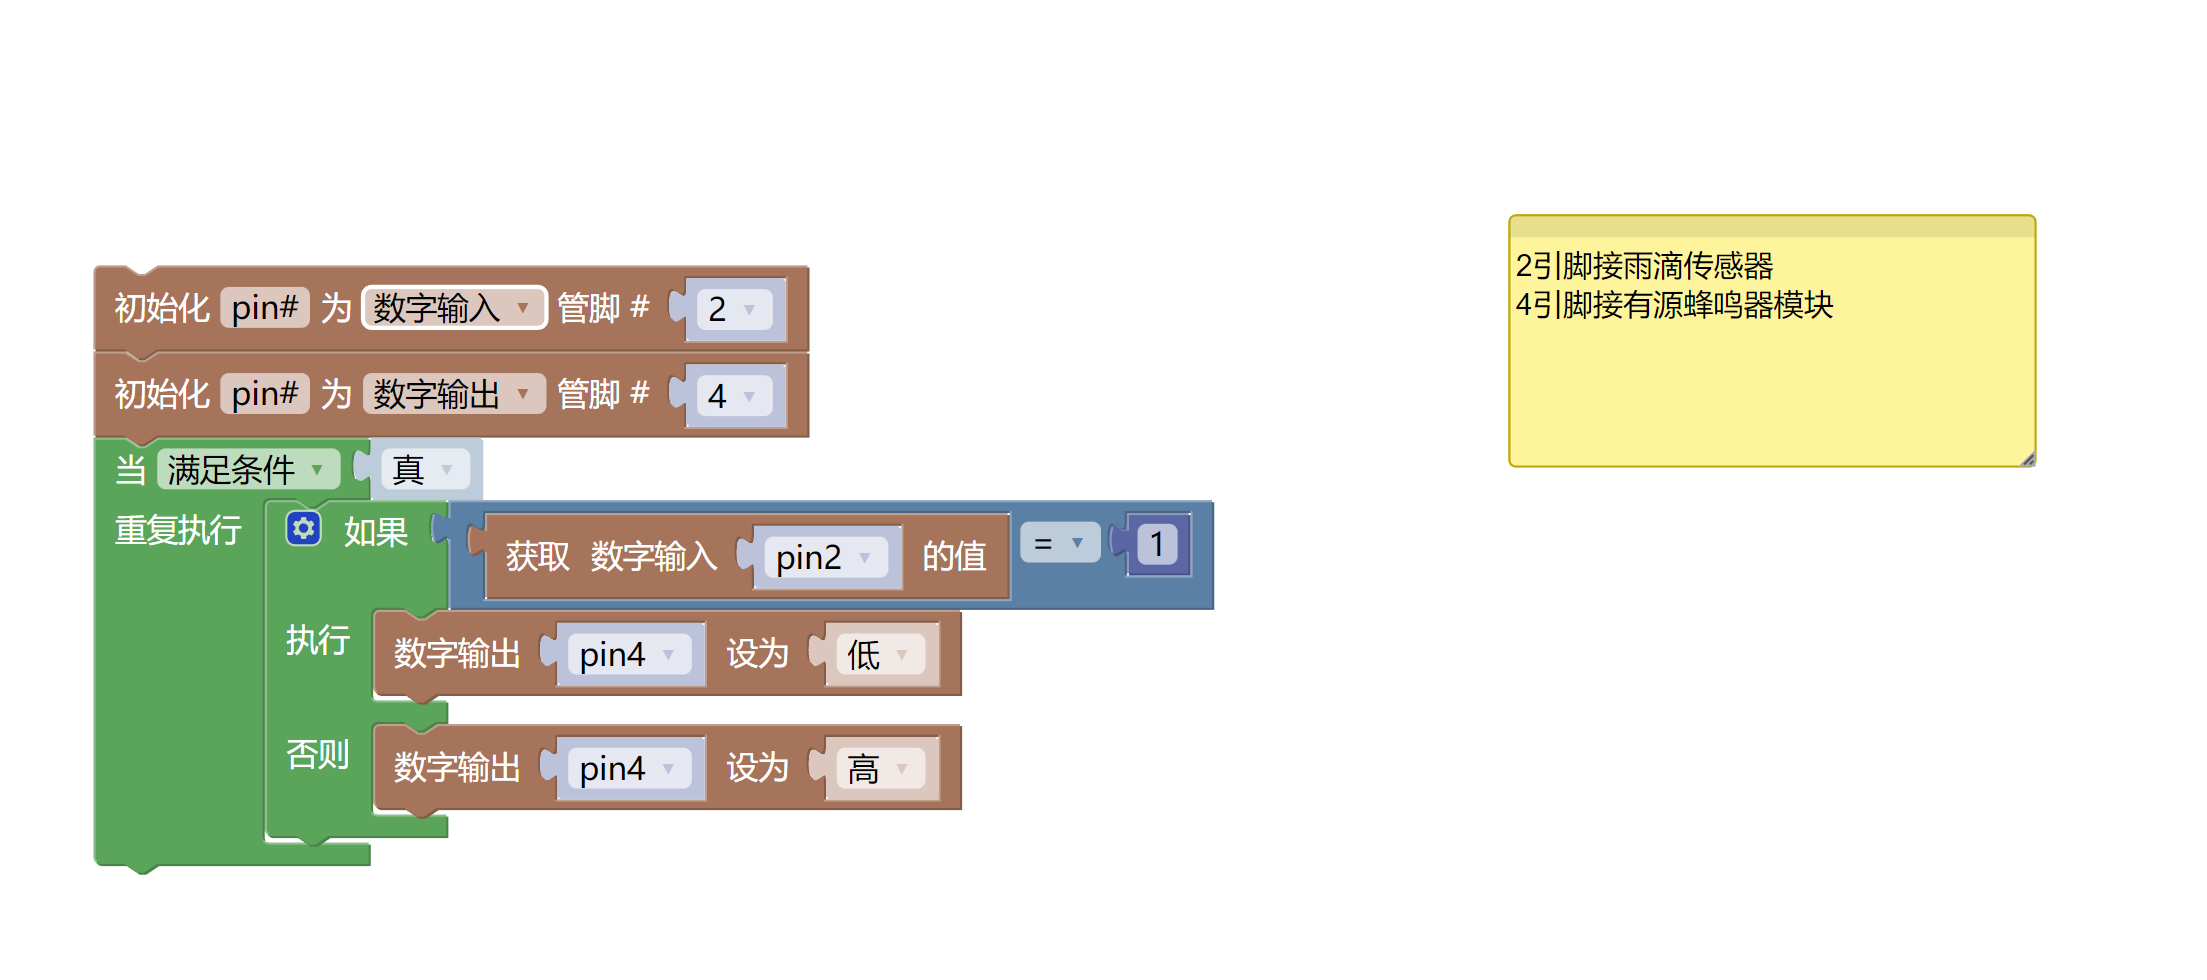
pin4.value(1)7, Mixly example program (graphical language)
Example program (UNO development board):Click to download
Attention: If prompted with an error message about the library file during program upload, please import the library file first!
Download and import tutorial of Mixly IDE Arduino library:Click to view
Example Program (ESP32 Development Board):Click to download
Attention: If prompted with an error message about the library file during program upload, please import the library file first!
Download and import tutorial for Mixly IDE ESP32 library:Click to view
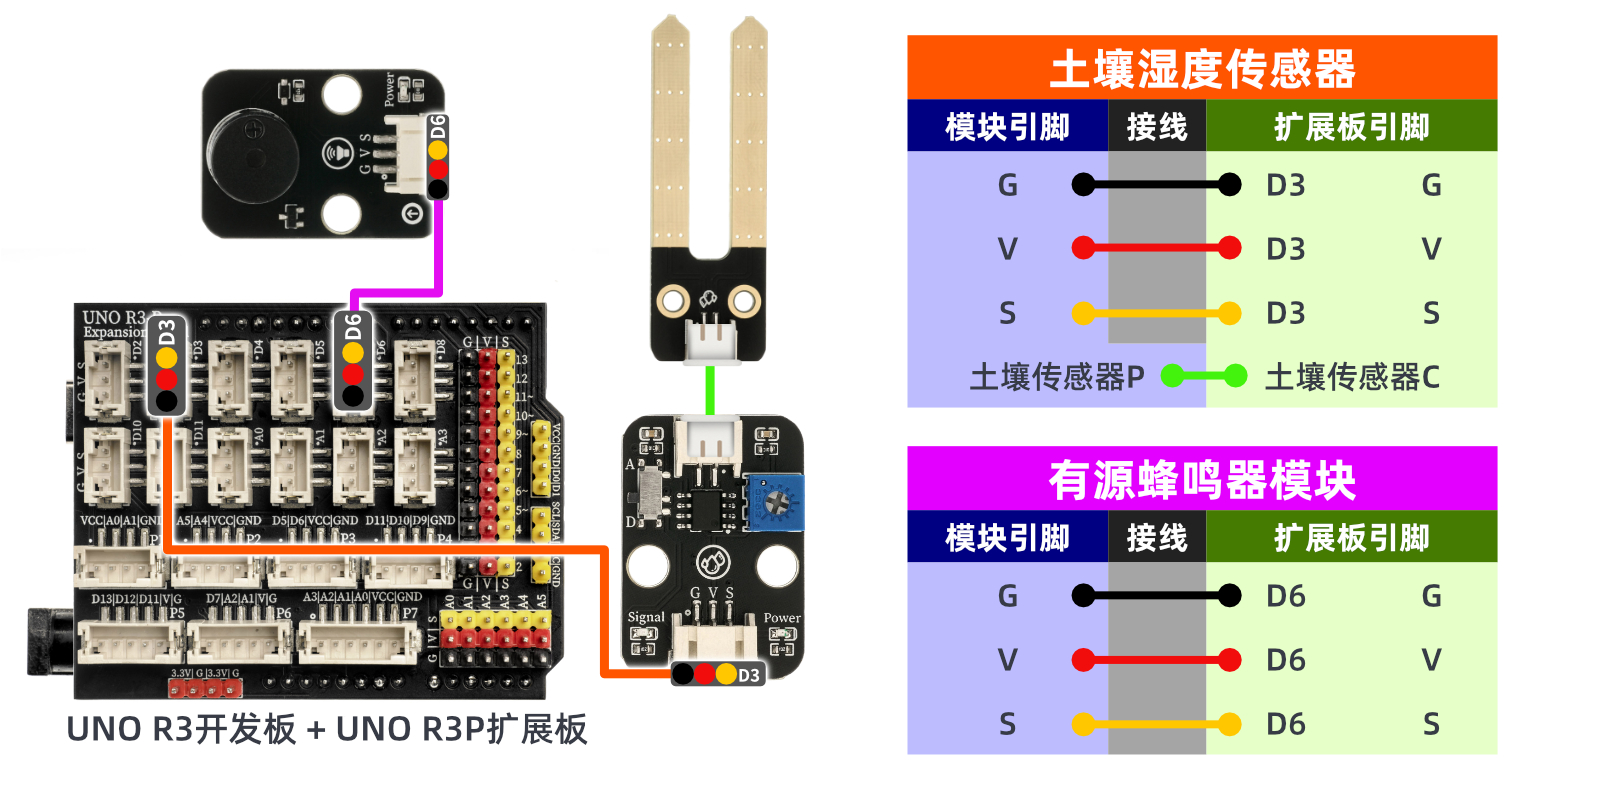
8. Setting up the Test Environment
Arduino UNO Test Environment Setup
Prepare Components:
UNO-R3 Development Board *1
UNO-R3 P Expansion Board *1
USB TYPE-C DATA CABLE *1
Soil Moisture Sensor (HS-S09L) *1
Soil humidity sensor (HS-S09C) * 1
Active buzzer (HS-F07L) * 1
PH2.0 2-pole dual-ended terminal line * 1
PH2.0 3P dual-head terminal line * 2
Circuit wiring diagram:
ESP32 Test Environment Setup
Prepare Components:Pending update...
Circuit wiring diagram:Pending update...
9, Video tutorial
Arduino UNO video tutorial:Click to view
ESP32 Python Video Tutorial:Click to view
10, Test results
Arduino UNO test results:
In the case of the soil moisture sensor module being powered on, gently adjust the potentiometer on the back of the control board module, the soil moisture detection board detects moisture, and the control board module indicates the blue light to turn on; in the case of the soil moisture detection board being dry, the control board module indicates the blue light to turn off.
After the device is connected to the wires, upload the above program to the Arduino UNO development board, open the serial monitor, insert the soil moisture sensor into the soil or water, and you will see the data change.

ESP32 Python test results:
In the case of the soil moisture sensor module being powered on, gently adjust the potentiometer on the back of the control board module, the soil moisture detection board detects moisture, and the control board module indicates the blue light to turn on; in the case of the soil moisture detection board being dry, the control board module indicates the blue light to turn off.
After the device is connected to the line, after the above program is burned to the ESP32 development board, open the serial monitor, insert the soil moisture sensor into the soil or water, and you can see that the data will change.